Community concept illustration—not an actual app screen.
Adding a Jupiter Card to a phone wallet should make an already-available card easier to use. It should not be treated as a workaround for an unavailable card, an unsupported country, or a failed identity check.
Check the card before opening the wallet
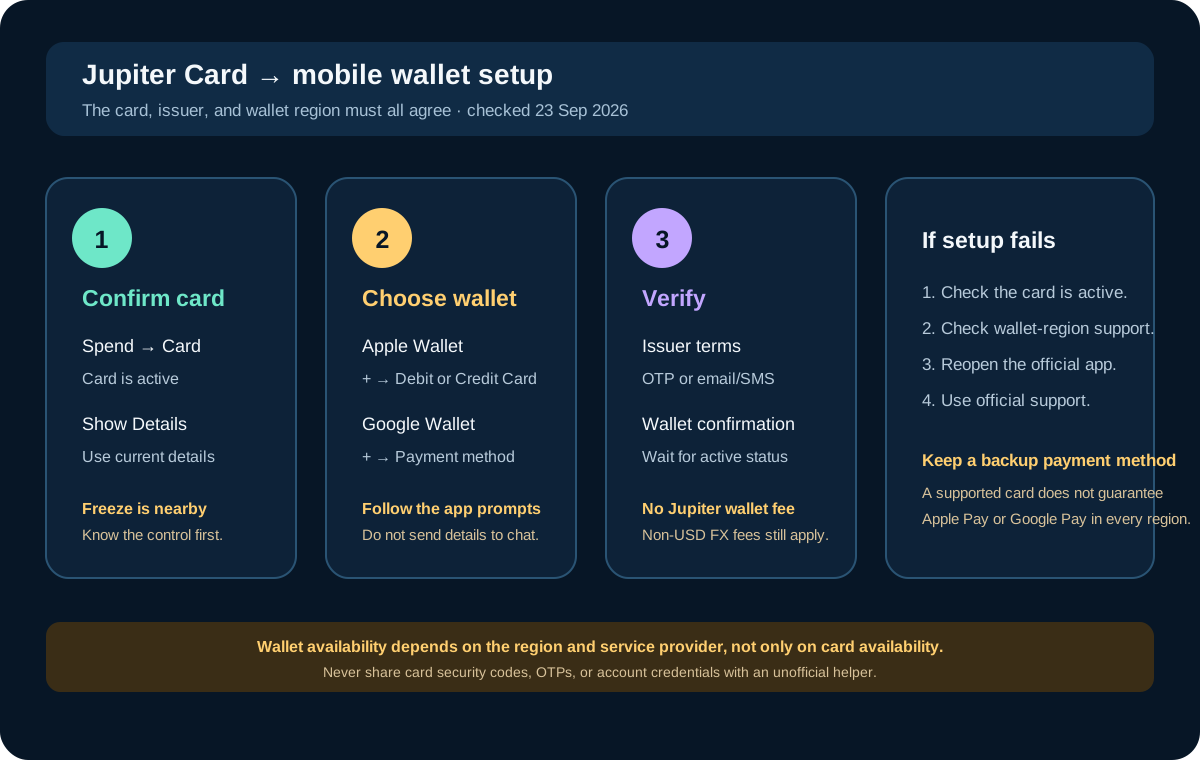
The Jupiter Card documentation puts card management under Spend → Card and describes a current card screen with Freeze, Show Details, Manage, and wallet controls. Confirm that the card is active and that you can view its details in the legitimate app before starting setup. Jupiter Card management
Learn where the Freeze control is before adding the card. If you later see an unexpected charge, knowing how to freeze quickly matters more than remembering the wallet setup steps.
Apple Pay setup
The documented Apple Pay sequence is:
1. Open Apple Wallet and tap the plus button. 2. Choose Debit or Credit Card and continue. 3. Enter the current card details shown in Jupiter’s Card screen. 4. Complete the verification requested by Apple Wallet.
Use the details shown by the current app, not a screenshot saved months ago. The wallet may ask for an issuer verification step, and the card may remain unavailable until that step finishes.
Google Pay setup
The documented Google Pay sequence is similar:
1. Open Google Wallet and choose Add to Wallet. 2. Select Payment method. 3. Enter the card details manually when prompted. 4. Accept the issuer’s terms and complete the SMS or email verification.
The exact labels can change with the phone’s operating-system version. Follow the current wallet interface and the in-app card details. If someone sends a different link or asks for a one-time code outside the wallet flow, stop.
Why a supported card can still fail
Jupiter’s card documentation says Apple Pay and Google Pay availability depends on the region. A country can support the Jupiter Card while Apple or Google does not support that wallet service there. That is a platform or regional limitation, not proof that your card details are wrong. Regional wallet limitation
Other common checks are straightforward:
- The card is frozen, expired, or not yet active.
- The phone is signed into a different account or region.
- The wallet service cannot verify the issuer in that country.
- The verification message went to an inaccessible phone number or email.
- The app is showing a different card than the one you are adding.
Do not repeatedly remove and add a card without understanding the message. Save the exact wording and use the official support path if the retry does not resolve it. Official support
Wallet setup does not change the card’s fees
The public documentation says Jupiter does not charge a fee for adding or using the card through Apple Pay or Google Pay. The issuer’s standard foreign-exchange fee still applies to non-USD payments. The wallet is another way to present the card; it does not change the issuer, residence assignment, balance, or merchant-category restrictions. Card and FX details · Spend FAQ
Check the currency before confirming a purchase. A phone wallet can make a tap feel automatic, but a merchant may still offer a local-currency charge or dynamic conversion. Read the amount and currency on the terminal or confirmation screen.
Test with a low-stakes purchase
After the wallet shows the card as active, test it with an ordinary purchase while you still have a backup method. Avoid making the first test a hotel deposit, rental-car hold, large online order, or a trip where a decline would strand you.
Keep the receipt and compare the wallet result with the transaction shown in Jupiter. A pending authorization is not the same as a completed payment. If the merchant says the payment failed but the app shows a pending charge, pause before trying again. Card safety and refunds
Security rules for wallet setup
Only use the official Jupiter app, Apple Wallet, or Google Wallet. Do not send full card details, security codes, passwords, seed phrases, or one-time codes to an account claiming to be wallet support. Apple and Google verification should happen in their own wallet flow or through the verified issuer prompt.
If the phone is lost, use the wallet’s device controls and freeze the card in Jupiter as soon as possible. Keep a separate payment method for travel and urgent purchases.
The clean finish line is simple: the card appears as active in the official wallet, a normal test purchase shows the expected currency and balance behavior, and you know how to freeze the card or contact support if the state changes.
Sources & what was checked
Public documentation reviewed 23 September 2026. This is a documentation-based guide, not a first-hand account, identity-verification or payment test. Open the current sources before acting.